

Happy Earth Day!


If you’re like me and have a slight obsession with kombucha, you probably have at least a few empty bottles at your place. I often up-cycle the bottles to use for storing dressings or smoothies, or as vases, but my favorite way to re-use them is to create terrariums! Treat yourself to some Clearly Kombucha, and save the bottle to make this cute craft.
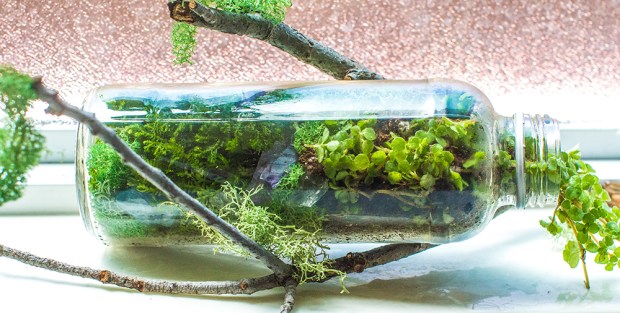
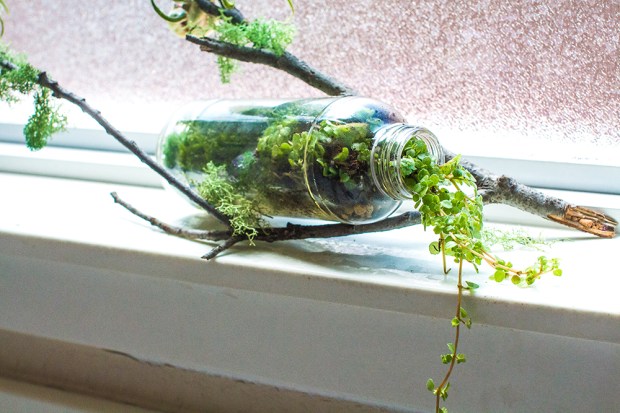
I wanted my bottle terrarium to be horizontal, which meant turning the bottle on its side. I went outside and searched for a branch that could serve to secure the bottle to keep it from rolling around (pictured below). I did some experimenting and found that a branch with a Y-shape is the best for this function. But if you want to make a vertical terrarium, there’s no need to find a branch.

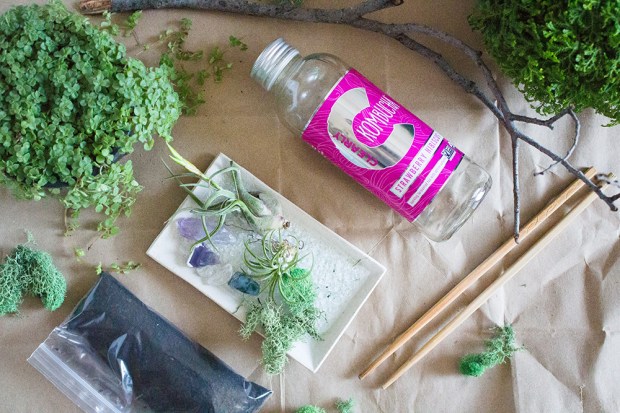
 You will need:
- 1 empty Clearly Kombucha bottle, rinsed and dried, with the label taken off
- a small Y-shaped branch, if using
- ~4 oz small rocks/gravel (you can also use aquarium gravel)
- activated charcoal (found at most garden shops or Home Depot)
- soil, at least 1/4 cup
- small plants for terrariums–use plants that like moist conditions. I used club moss (Selaginella kraussiana) and baby’s tears (soleirolia soleirolii).
- reindeer moss (available at most craft stores)
- crystals or other ornaments (optional–just for decoration)
- air plants (aka: tillandsia! Optional, for decorating the branch)
- chopsticks and a spoon that is small enough to fit through the kombucha bottle opening (you may need to tape the spoon to a chopstick so it’s long enough)
I took step-by-step photos, but scroll down to read the directions associated with each step!
 Directions:
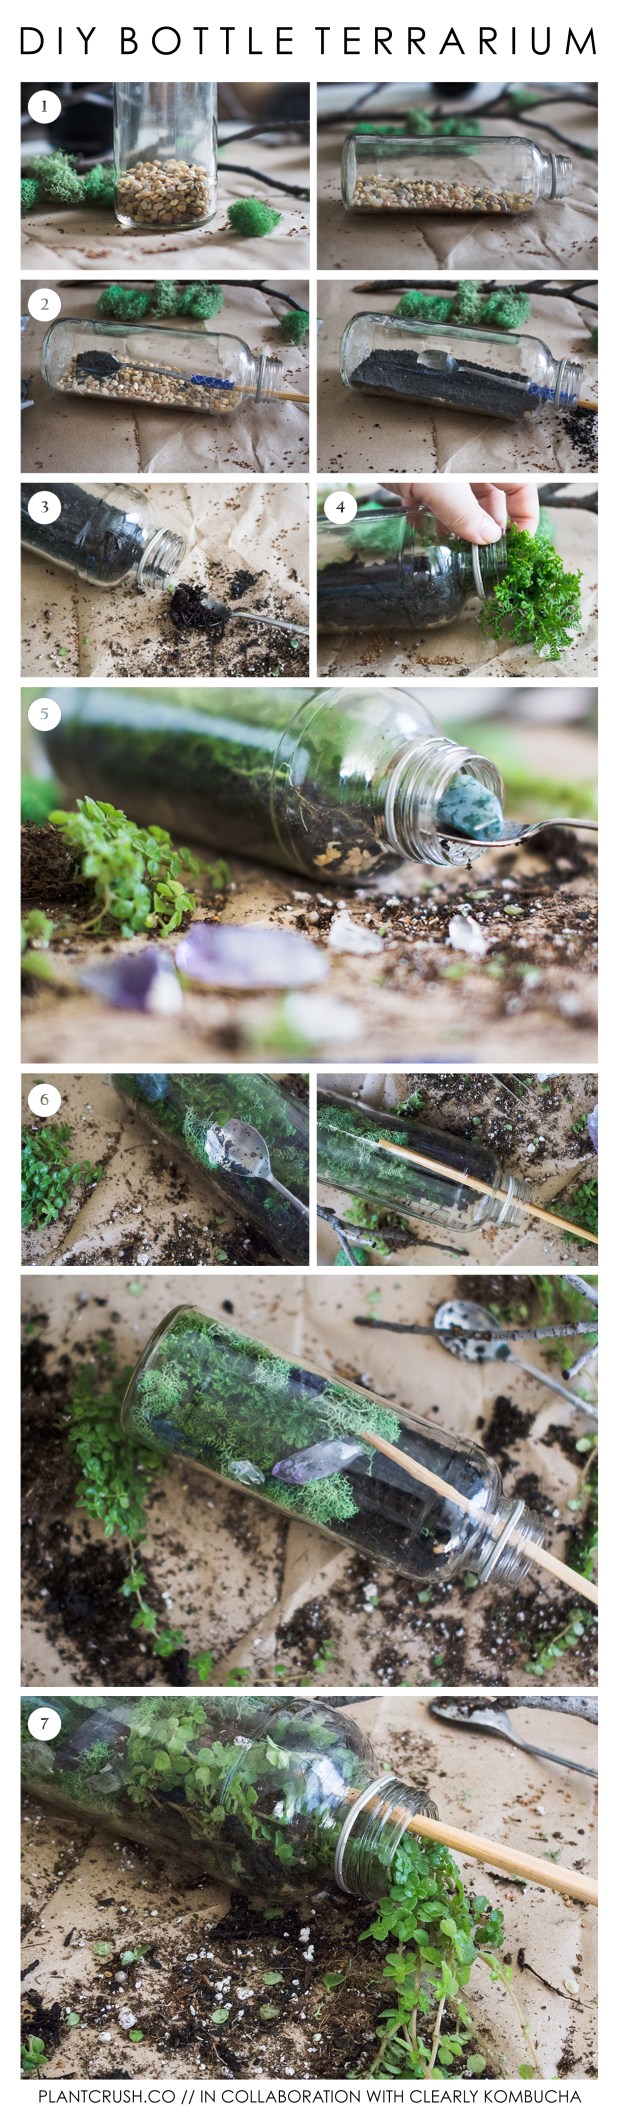
- Pour about four ounces of gravel/small rocks into the bottle. Turn the bottle on its side. Stabilize it with some tape if you need to while you’re working.
- Using your spoon, distribute a thin layer of activated charcoal on top of the gravel layer.
- Add a layer of soil on top of the charcoal layer (using the spoon to smooth things out). I distributed about 1/4 cup of soil.
- Break off some of the club moss, with its soil and roots still intact, and gently push it through the bottle opening with your fingers. From there, use a chopstick to push the plant where you want it to go.
- Use the spoon to place a crystal in the terrarium. With a chopstick, I pushed some reindeer moss in as well. If the crystal seems loose, anchor it a bit with some reindeer moss and/or soil.
- Continue adding club moss (or your plant of choice), crystals, and moss in this manner until you are about 3/4 through the bottle.
- I saved my baby’s tears plant for last because I wanted the delightful tendrils to spill out of the bottle opening (resulting in an open terrarium instead of a closed one). Gently push the plant through the opening with your fingers and use a chopstick to adjust it to your liking.
Now find a spot for your terrarium and set it up with the branch, if using! I decorated my branch with reindeer moss and air plants. The finished look is slightly rustic/wild, yet modern–basically my aesthetic goals.

To care for your terrarium, place it in a bright area (but not direct sunlight) and spray the inside of the bottle with water every couple weeks–be sure not to overwater! Terrariums are mostly self-sustaining so you can neglect them until you notice the soil looks a little dry. For more detailed information about terrarium care, including care for different types of plants, check out this site.
I know it’s been a while since I’ve posted on here, but I couldn’t let Earth Day go by without posting some fun green content. This is my first DIY post on this blog, one of many, I am sure. I hope you enjoyed it–please let me know your thoughts in a comment!
A huge thank you to Clearly Kombucha for sponsoring this post and making this beautiful project possible! A note to my readers: I will only work with brands I believe in, and I would never do sponsored posts for products I don’t personally believe in. All opinions are my own.


Ann, this is truly such a beautifully written and photographed tutorial. I’m in total awe over it! You’re amazing! Thank you for sharing this lovely DIY ❤
Aww thank you so much, Margaret!! I’m so glad you love it–I worked super hard on it! 🙂 Thank you so much for always supporting me and for checking out my tutorial! 🙂 Love you!!
I LOVE YOU! I can see how much you put into this, your work speaks volumes! ❤
Thanks so much, love!!! Miss you!!!
Wow! This looks stunning! Thank you for sharing 🙂
I really enjoy the spill over effect created by the baby tears (soleirolia soleirolii). Also the use of the moss covered branch is a brilliant finishing touch.